Introduction
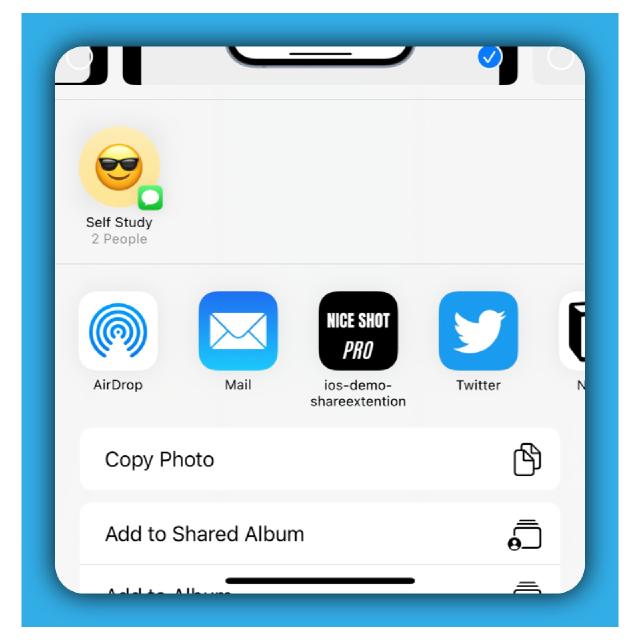
One of the most useful features in iOS, is the ability to share data between apps using share-sheet menu.
This sheet feature is generally used to share data like urls, images, videos to upload as social media posts.
 |
|---|
| ➚ This beautiful screenshot was taken from my iOS app. Get it for yourself! |
While using a share-sheet in iOS, is relatively simple, the same cannot be said for building the receiving end of the share-sheet.
What is a share extension?1
In order for your iOS apps to be able to receive data from a share-sheet, you’ll want to create a ‘share extension’ and release it with the app.
In this tutorial, you’ll learn the following:
- How to setup a share extension for your app
- How to pass an image to your app’s share extension
- How to render the image in your share extension using SwiftUI
How to build a share extension?
Setup
You can create a share extension for an iOS app in Xcode using the following method:
Click on the project folder in file explorer in your iOS app project
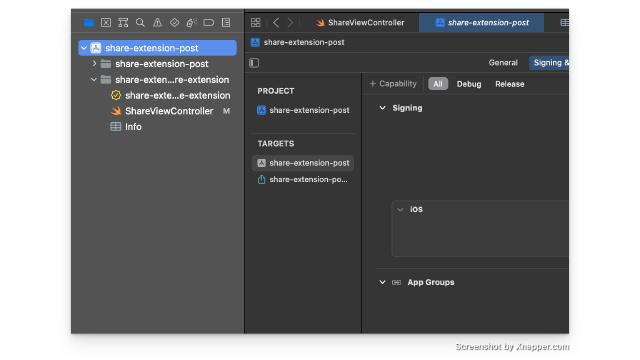
Click the
+icon in the botton toolbar as showing the image below
Search, click on share extension & click
Activatein the next dialog box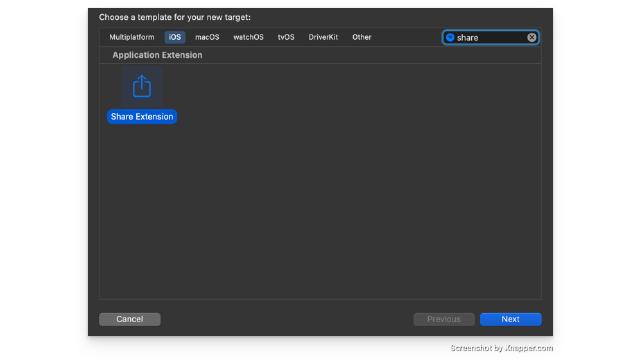
💡 If Xcode asks you to provide a name for your share extension, give it a name that fits your needs.
Once this is setup, you’ll be able to see a share extension view created in your file explorer.
Configuration settings
Delete all code from
ShareViewController.swiftfile and add the following code:import UIKit @objc(PrincipalClassName) class ShareViewController: UIViewController { override func viewDidLoad() { super.viewDidLoad() // do something here } }In
infofile, Insert the keyNSExtensionPrincipalClasswith valuePrincipalClassNameas provided in the image below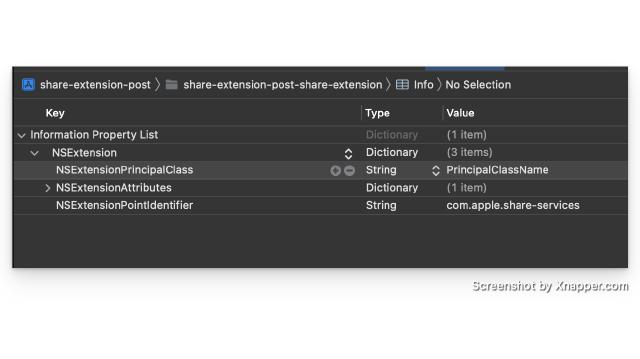
In
infofile, delete theNSExtensionMainStoryboardkey-value pair because we won’t be needing itDelete the file
MainInterface.storyboardfile (if you want to) because we will not be needing it
We can now start focusing on the functionality.
Handling the inputs to the share extension
In ShareViewController.swift, we shall add functionality to your share extension to do perform some active with given input from share-sheet.
We have overridden the viewDidLoad method to do something when the extension loads in the system and on your screen.
In the UIViewController object, we use the self.extensionContext to extract the input data from the share-sheet.
💡 In our example, we would like to render images from our gallery in our extension.
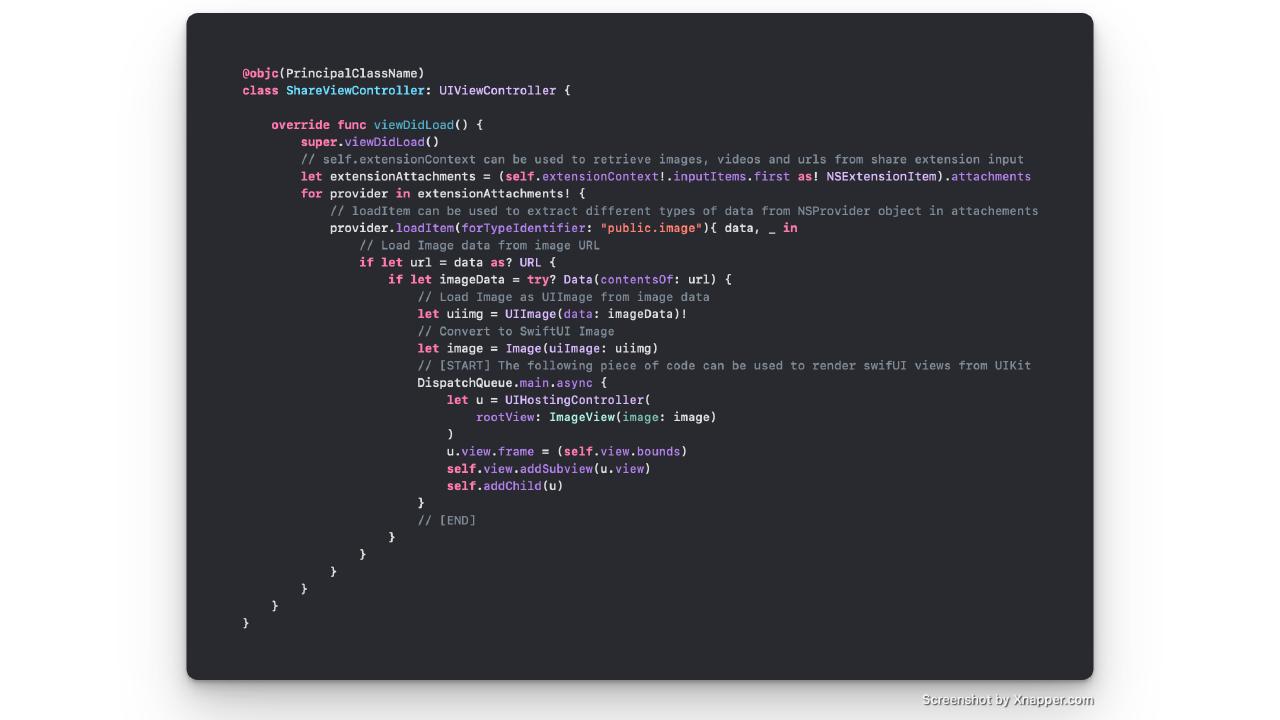
Before I explain how this is done, here’s the piece of code we use to get this done:
import UIKit
import SwiftUI

@objc(PrincipalClassName)
class ShareViewController: UIViewController {

    override func viewDidLoad() {
        super.viewDidLoad()
        // self.extensionContext can be used to retrieve images, videos and urls from share extension input
        let extensionAttachments = (self.extensionContext!.inputItems.first as! NSExtensionItem).attachments
        for provider in extensionAttachments! {
            // loadItem can be used to extract different types of data from NSProvider object in attachements
            provider.loadItem(forTypeIdentifier: "public.image"){ data, _ in
                // Load Image data from image URL
                if let url = data as? URL {
                    if let imageData = try? Data(contentsOf: url) {
                        // Load Image as UIImage from image data
                        let uiimg = UIImage(data: imageData)!
                        // Convert to SwiftUI Image
                        let image = Image(uiImage: uiimg)
                        // .. Do something with the Image
                    }
                }
            }
        }
    }
}
The above code does the following:
- We extract the
attachmentscontaining data like image, urls, video etc - Since we want the image, we extract image data using
public.imagetypecast, from the attachments into data variable - The data contains a local url that represents the image in our device, which looks like for example
data/Media/PhotoData/OutgoingTemp/XXX/IMG_0001.PNG - The url is loaded into
UIImageobject which is converted toImageobject in SwiftUI
How to render swiftUI in a share extension?
We have the required Image object in SwiftUI, we now have to render a SwiftUI view inside the share extension using the following piece of code:
// ..
// [START] The following piece of code can be used to render swifUI views from UIKit
DispatchQueue.main.async {
    let u = UIHostingController(
        rootView: ImageView(image: image)
    )
    u.view.frame = (self.view.bounds)
    self.view.addSubview(u.view)
    self.addChild(u)
}
// [END]
// ..
💡 The class
UIHostingControlleris a UIKit view controller, that can embed anySwiftUIView as a child view.
The sample code snippet for rendering looks like this,
import UIKit
import SwiftUI

@objc(PrincipalClassName)
class ShareViewController: UIViewController {

    override func viewDidLoad() {
        super.viewDidLoad()
        // self.extensionContext can be used to retrieve images, videos and urls from share extension input
        let extensionAttachments = (self.extensionContext!.inputItems.first as! NSExtensionItem).attachments
        for provider in extensionAttachments! {
            // loadItem can be used to extract different types of data from NSProvider object in attachements
            provider.loadItem(forTypeIdentifier: "public.image"){ data, _ in
                // Load Image data from image URL
                if let url = data as? URL {
                    if let imageData = try? Data(contentsOf: url) {
                        // Load Image as UIImage from image data
                        let uiimg = UIImage(data: imageData)!
                        // Convert to SwiftUI Image
                        let image = Image(uiImage: uiimg)
                        // [START] The following piece of code can be used to render swifUI views from UIKit
                        DispatchQueue.main.async {
                            let u = UIHostingController(
                                rootView: VStack {image.resizable().aspectRatio(contentMode: .fit)}
                            )
                            u.view.frame = (self.view.bounds)
                            self.view.addSubview(u.view)
                            self.addChild(u)
                        }
                        // [END]
                    }
                }
            }
        }
    }
}
Code snippet
We can create a custom SwiftUI struct and plug it with UIHostingController2.
import UIKit
import SwiftUI

struct ImageView: View {
    @State var image: Image

    var body: some View {
        VStack {
            Spacer()
            Text("👋 Hello, from share extension").font(.largeTitle)
            image.resizable().aspectRatio(contentMode: .fit)
            Spacer()
        }
    }
}


@objc(PrincipalClassName)
class ShareViewController: UIViewController {

    override func viewDidLoad() {
        super.viewDidLoad()
        // self.extensionContext can be used to retrieve images, videos and urls from share extension input
        let extensionAttachments = (self.extensionContext!.inputItems.first as! NSExtensionItem).attachments
        for provider in extensionAttachments! {
            // loadItem can be used to extract different types of data from NSProvider object in attachements
            provider.loadItem(forTypeIdentifier: "public.image"){ data, _ in
                // Load Image data from image URL
                if let url = data as? URL {
                    if let imageData = try? Data(contentsOf: url) {
                        // Load Image as UIImage from image data
                        let uiimg = UIImage(data: imageData)!
                        // Convert to SwiftUI Image
                        let image = Image(uiImage: uiimg)
                        // [START] The following piece of code can be used to render swifUI views from UIKit
                        DispatchQueue.main.async {
                            let u = UIHostingController(
                                rootView: ImageView(image: image)
                            )
                            u.view.frame = (self.view.bounds)
                            self.view.addSubview(u.view)
                            self.addChild(u)
                        }
                        // [END]
                    }
                }
            }
        }
    }
}
Demonstration
Conclusion
In this tutorial, you’ve learnt how build a simple share extension for an iOS app. This knowledge can be good enough to start building one for your next project.