How to Build a Simple Websocket Server and Client in Go and Javascript?

Share:

Dec 16, 2023 552 Words

Read Time: 3 Minutes

In this guide, you'll create a basic WebSocket echo program in Golang using the Gorilla WebSocket library (and test it with javascript client).

Introduction

WebSocket is a communication protocol that enables bidirectional communication between a client and a server. It is commonly used for real-time applications where instant data updates are crucial like a chat application.

In this guide, we’ll create a basic WebSocket echo program in Golang using the Gorilla WebSocket library (and test it with javascript client).

Setting Up the Server

Let’s start by creating a simple Go program that acts as the WebSocket server. This program will echo back any messages it receives from clients.

package main

import (
	"fmt"
	"github.com/gorilla/websocket"
	"net/http"
)

var upgrader = websocket.Upgrader{
	CheckOrigin: func(r *http.Request) bool {
		return true
	},
}

func echo(w http.ResponseWriter, r *http.Request) {
	c, err := upgrader.Upgrade(w, r, nil)
	if err != nil {
		fmt.Print("upgrade:", err)
		return
	}
	defer c.Close()

	// Welcome message
	c.WriteMessage(websocket.TextMessage, []byte("Welcome"))

	for {
		mt, message, err := c.ReadMessage()
		if err != nil {
			fmt.Println("read:", err)
			break
		}

		fmt.Printf("Received: %s\n", message)

		err = c.WriteMessage(mt, message)
		if err != nil {
			fmt.Println("write:", err)
			break
		}
	}
}

func ping(w http.ResponseWriter, r *http.Request) {
	fmt.Fprintf(w, "pong\n")
}

func main() {
	fmt.Println("WebSocket Server Running on :8080")
	http.HandleFunc("/echo", echo)
	http.HandleFunc("/ping", ping)
	http.ListenAndServe(":8080", nil)
}

This code sets up a simple WebSocket server using the Gorilla WebSocket library. The /echo endpoint handles WebSocket connections, and the root endpoint / responds with “pong” to any HTTP requests.

Creating WebSocket Client

Now, let’s create a basic HTML file and sprinkle in some vanilla javascript code to act as our WebSocket client.

<!DOCTYPE html>
<html>
    <head>
        <title>WebSocket Client</title>
    </head>
    <body>
        <h1>WebSocket Client</h1>
        <!-- Output of websocket reception gets populated here -->
        <p id="dataSync"></p>
        <script>
            var ws = null
            var sync = document.getElementById("dataSync")
            // Package up the websocket connection declarations and required behaviour.
            function reconnect() {
                ws = new WebSocket("ws://localhost:8080/echo")
                ws.onopen = function (e) {
                    console.log("Opening WebSocket connection", e)
                }
                ws.onclose = function (e) {
                    console.log("Closing WebSocket connection")
                }
                ws.onmessage = function (e) {
                    console.log("Received a message via WebSocket connection", e.data)
                    sync.innerText = e.data
                }
            }
            // Implement a check to ensure we can re-establish a websocket connection
            // ..if existing connection is either closed or doesn't exist at all!
            function check() {
                !ws || ws.readyState == ws.CLOSED ? reconnect() : ''
            }
            // Invoke!
            reconnect()
            // Periodic check to re-establish a new connection if current is closed or non-existent, every second.
            setInterval(check, 1000)
        </script>
    </body>
</html>

This simple HTML file includes a WebSocket client using JavaScript. It connects to the WebSocket server running on ws://localhost:8080/echo and displays any received messages in the dataSync paragraph.

Running the Program

  1. Save the server code in a file named main.go and the client code in an HTML file, e.g., client.html

  2. Run the following commands in your terminal if you’re using go1.11 or newer version:

    go mod init websocker-server-example && go mod tidy
    
  3. Open a terminal and run the server:

    go run main.go
    
  4. Open your web browser and navigate to http://localhost:8080/ping to see the “pong” response

  5. Open the client HTML file in a web browser. You should see the WebSocket client connecting to the server and displaying received messages

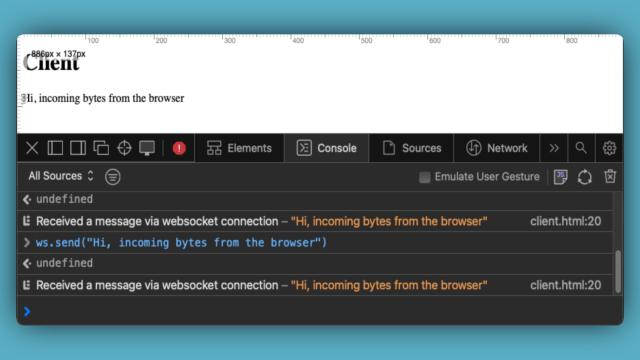
  6. Open the dev console and send a simple websocket signal using the following code

ws.send("Hi, incoming bytes from the browser")
  1. You should see the same data in your html body

Hi, incoming bytes from the browser

Great! You’ve just built a simple WebSocket echo program in Go.

👋 — @TnvMadhav

Find more posts from following topics

accurate-requests
api-development
api-testing
api-testing-tools
array
automated-testing
bad-habits
base64-decoder
base64-encoder
binding
blog
blogging
bulma-css
bulma.io
button-swiftui
chatgpt
chrome
clipboard
code
code-block
code-snippet
comparison
compile
configuring-debugger-for-django-in-vs-code
configuring-launch.json-for-python-debugger
copy
copy-to-clipboard
copy-to-clipboard-neovim
css
current-date
current-time
current-timestamp
debugger-setup-in-visual-studio-code
debugging-django-app-in-visual-studio-code
debugging-python-code-in-visual-studio-code
debugging-python-programs-with-visual-studio-code
debugging-python-with-virtual-environment-in-vs-code
developer-productivity
developers
development-workflow
dom
dynamic-sitemap-in-nextjs
engineering-dashboard
flowcharts
git
git-diff
github
global-keyboard-shorcut
global-shortcut
go
go-hugo
go-programming
go-to-line
golang
golang-development
good-habits
gorilla-websocket
gpt
gpt-3.5
gpt-4
gpt-4-api
guide
gumroad
habits
habits-tracker-notion-template
hamburger-menu
hotkeys
html
hugo
ide
image
image-sharing
image-tool-for-ios
imagerenderer
include-timestamp
integrated-development-environment
ios
ios-16
ios16
javascript
keyboard-shortcut
linux
macos
map
markdown
markdown-code
mental-programming
menu
menubarextra
mergesort
mermaid-syntax
mistake-tracker-notion
mobile-view
modifier
navbar
navigationlink
navigationstack
neovim
next.js
nextjs
nextjs-markdown
nextjs-sitemap
nextjs-sitemaps
nice-shot
nice-shot-pro
notion
notion-api
notion-api-python
notion-budget
notion-budget-template
notion-budget-tracker
notion-bug-report-tracker
notion-dashboard
notion-expense-manager
notion-habits
notion-habits-dashboard
notion-habits-template
notion-habits-tracker
notion-habits-tracker-template
notion-issue-tracker
notion-mistake-tracker
notion-product
notion-product-dashboard
notion-product-roadmap
notion-product-roadmap-dashboard
notion-tasks
notion-tasks-dashboard
notion-tasks-template
notion-tasks-tracker
notion-template
notionworkspaces
openai
osx
personal-ifttt-framework
photospicker
photospickeritem
phpickerfilter
postman-capabilities
postman-request
pre-request-script
product-roadmap-notion-template
product-roadmap-template
productivity
programming
python
python-api
python-debugger-tutorial-for-vs-code
python-debugging-mode-in-vs-code
python-notion-api
python3
real-time-communication
rehype
remark
request-data
running-debugger-in-visual-studio-code
running-django-app-in-debugging-mode
running-program-in-debugging-mode-in-vs-code
running-python-code-in-debugging-mode
safari
screenshot-app-for-ios
screenshot-app-ios
screenshot-ios
screenshot-tool-for-ios
set-current-timestamp
setting-up-debugger-in-vs-code-for-python
share-extension
sharelink
sharepreview
sharesheet
simple-websocket-server
sitemap
slice
slider
sorting
space-complexity
step-by-step-guide
stocks-profits-tracker
stocks-profits-tracker-template
stocks-tracker
struct
sustained-vigilance
swift
swiftui
swiftui-button
swiftui-button-action
swiftui-button-style
table-of-contents
tasks-tracker-notion-template
textfield-swiftui
til
tim-sort
time-complexity
timeliness
timestamp-integration
timsort
transferable
triggers-and-actions
tutorial
us-stocks
usa-stocks
useful-ios-features
using-breakpoints-in-python-debugger
using-virtual-environment-with-python-debugger
vanilla-javascript
variable
vim
visual-mode
visual-studio-code
vs-code
vscode
vscode-go-to-line
web-sockets-in-go
websocket-client
websocket-programming
websocket-server
xcode